Dialogue Editor
Dialogue Editor
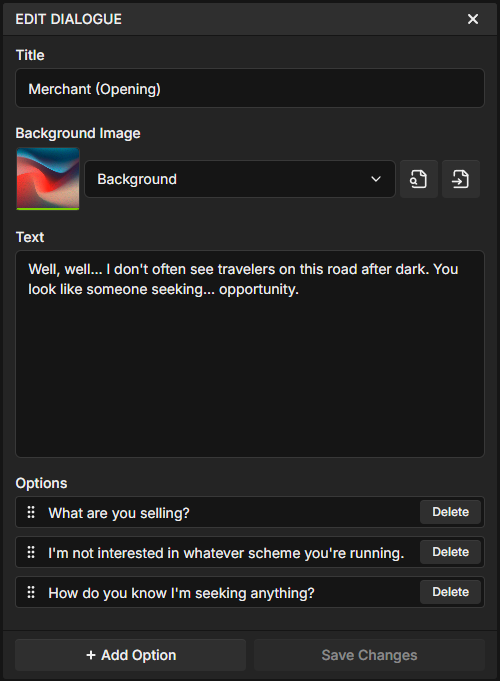
The Dialogue Editor is a powerful side panel that provides a dedicated interface for editing Dialogue nodes with support for text, player options, background images, and more.
Overview
The Dialogue Editor is a collapsible side panel that appears on the right side of the visual scripting system (also referred to as the node editor) when you're working with Dialogue nodes. It provides a rich editing experience with dedicated fields for all dialogue properties, making it easier to create complex interactive conversations than editing directly in the node visual.
Key Features:
- Dedicated Text Editing: Large text area with multiline support for dialogue content
- Visual Image Selector: Browse and preview background images from your project's Content folder
- Option Management: Add, edit, reorder, and delete player response options with drag-and-drop
- Unsaved Changes Tracking: See what you've modified before applying changes
- Auto-Preserve State: Your edits are preserved when switching between nodes or files
Opening the Editor
To open the Dialogue Editor, double-click any Dialogue node in the node graph. The editor panel will expand automatically from the right side of the screen.
The panel stays open as you work, allowing you to double-click different Dialogue nodes to instantly switch between editing them. The panel will automatically collapse when you select a non-Dialogue node (like a Branch node or Variable node), keeping your workspace clean.
User Interface
The Dialogue Editor is organized into four main sections, each handling a different aspect of your dialogue.
Title Field
The Title field is an optional text field that appears in the dialogue node header. It's primarily used for organization within the editor and is not displayed to players during playback.
- Optional: Can be left empty if not needed
- Display: Visible in the editor node header, but not shown to players during runtime
- Common uses: Speaker identification ("Narrator", "Alice"), scene labels ("Town Square - Morning"), conversation topics ("Quest Intro"), or any organizational text
Editor Organization
The Title field helps you organize and identify dialogue nodes at a glance when working with large conversation trees. For example, labeling a node "Captain Elena - Quest Start" makes it easy to find later.
Background Image
Add visual context to your dialogue with background images. Perfect for visual novels, illustrated stories, or creating atmosphere in your narrative.
Image Selection Features:
- Visual Browser: Browse all images from your project's Content folder with live previews
- Drag-and-Drop: Drag images directly from the Content Browser into the image selector
- Search Functionality: Filter images by filename to quickly find what you need
- Quick Actions:
- Show in Content Browser: Locate the selected image in your file tree
- Open File: View the image in your system's default image viewer
- Preview: See a thumbnail of the selected image directly in the editor
Supported Formats
The image selector displays all image files from your Content folder. Supported formats are PNG and JPEG/JPG only. Images are referenced by their relative path from the Content folder.
Drag-and-Drop Workflow:
- Navigate to your images folder in the Content Browser (e.g.,
Content/Images/) - Drag an image file from the Content Browser
- Drop it onto the image selector area in the Dialogue Editor
- The image is automatically selected and previewed
Text Area
The Text field contains the main dialogue content that players will read. This is the core of your narrative.
Features:
- Multiline Support: Press
Shift + Enterto create new lines within your dialogue - Large Editing Area: Expanded text area makes it easy to write and edit longer passages
- Real-time Display: Text appears in the dialogue box exactly as you type it
Options Management
Options are the dialogue responses that create branching narratives. Each option represents a button the player can click, leading to different story paths.
Managing Options:
- Add Option: Click the "Add Option" button to create a new option. Options are automatically assigned unique IDs.
- Edit Text: Click on an option's text to edit what the player will see (e.g., "Accept the quest", "Decline politely", "Ask for more information")
- Reorder Options: Drag and drop options to change their display order. Players will see them in this order from top to bottom.
- Delete Option: Click the delete button (×) to remove an option. This cannot be undone.
Option Connections
When you delete an option, any connections from that option's output handle will also be deleted. Make sure to reconnect your story flow if needed.
Option Handles:
Each option in a Dialogue node has two handles in the node graph:
- Left Handle (Condition Input): Connect a boolean value to show/hide the option based on game state (e.g., only show "Use key" if player has the key)
- Right Handle (Execution Output): Connect to the next node that executes when the player selects this option
Unsaved Changes
The Dialogue Editor intelligently tracks your modifications and provides clear feedback about unsaved changes.
How It Works:
- Automatic Tracking: The editor compares your current edits against the saved node data
- Visual Indicator: A "Reset Changes" button appears when you have unsaved modifications
- State Preservation: Your edits are preserved when you switch to other nodes or files, allowing you to continue editing later
- Click to Revert: Click "Reset Changes" to discard your edits and restore the node to its saved state
When Unsaved Changes Are Cleared:
- When you click "Reset Changes"
- When you click "Save Changes" (because there are no unsaved changes anymore)
Tips & Tricks
Organizing Large Dialogues
For complex conversations with many branches, some developers:
- Write descriptive option text that clearly indicates the player's selection
- Keep individual dialogue nodes focused on one exchange or topic
- Use the Title field consistently (e.g., showing character names) for visual clarity
- Add Comment nodes to annotate complex dialogue trees
Image Workflow
Image management options:
- You can organize images in subfolders within Content (e.g.,
Content/Backgrounds/,Content/Characters/) - Consistent naming conventions can make searching easier (e.g.,
char_elena_happy.png) - You can drag and drop images directly from the Content Browser for quick selection
- The search field in the image selector lets you filter by filename when you have many images
Option Design
Player option examples:
- Many developers use 2-4 options per dialogue node for readability
- Active and specific option text ("Search the ruins" compared to "Okay") can be clearer
- You can use conditional options (boolean variables) to reveal options based on player progress
- You can order options however you prefer based on your game's design
Next Steps
Now that you understand the Dialogue Editor, explore these related topics:
- Node Types Reference - Learn about all 21 node types including Dialogue nodes
- Connections - Understand how to connect options to create branching narratives
- Content Browser - Manage your images and script files
- Variables - Use boolean variables to create conditional dialogue options